
PIY stands for Print It Yourself
Hurray! I am back and I have an awesome tutorial for you!! It is how to print your own fabric!! For the last little while I have been searching and searching for the perfect fabric. The challenge, was that nothing was within my budget. I have no desire to spend hundreds of dollars on the perfect fabric. So instead, I am obsessed with printing my own fabric and checked out every book on the subject from my local library.
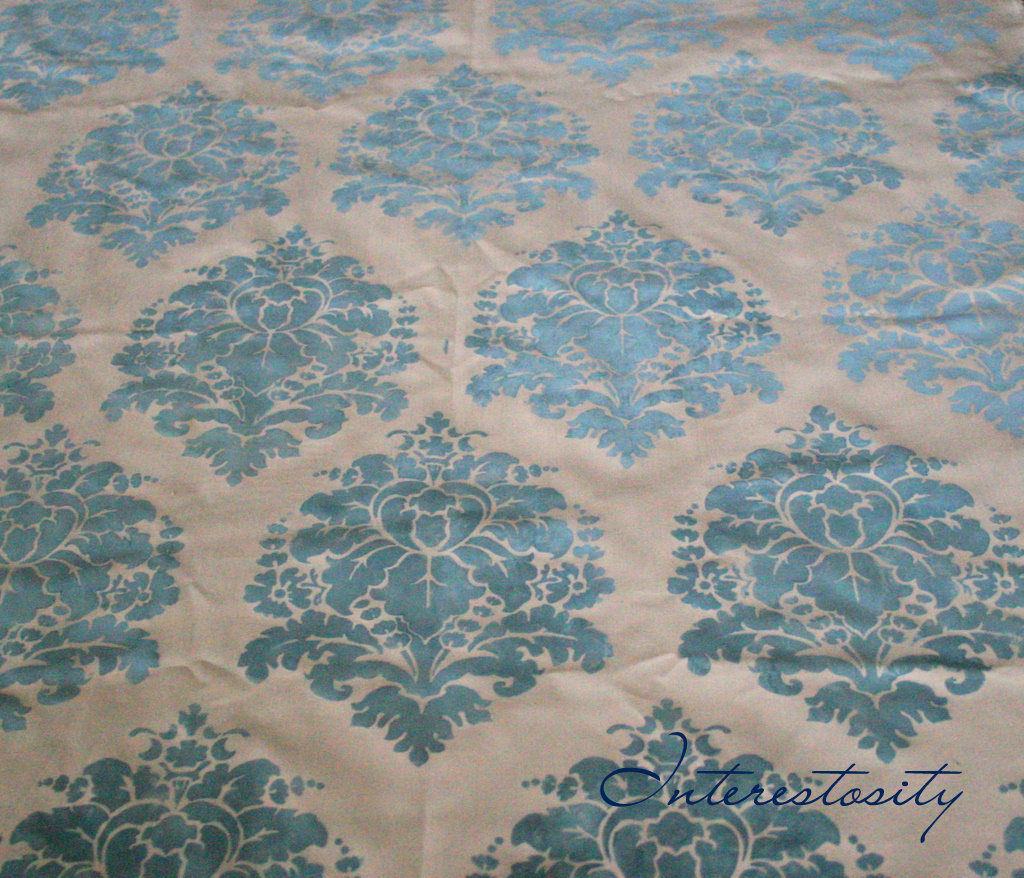
There are many ways to print your own fabric, most of which use stamps or making your own stamp using a lino block. But did you know you can also print using stencils? Well, you can and here is how you do it!!

The secret is using "block printing ink." The ink that I used is a Speedball Block Printing Ink Set  You can buy block printing ink at most craft stores. I bought mine at Hobby Lobby using a 40% off coupon. I also bought my stencil at Hobby Lobby using a 40% off coupon (different trip.) The price on the stencil was $2.99 before the coupon, the individual inks are $4.19 before coupons. There are other fabric inks that you can buy and if you are doing a large project it is more economical to buy large bottles of ink!
My fabric is a light gray poly/cotton mix(guessing) that I bought from WalMart, at an easy $1.50 a yard. Have you ever looked through WalMart's "Undetermined" fabric? Its kinda fun. I will do a post on that soon too, as it is another great way to save money on your craft projects. So here we go...
How to Print Your Own Fabric:

Supplies:
Fabric
Sponge
Stencil
Block Printing Ink
Iron
- Prewash and dry your fabric!! Don't forget this step!! This will help the ink sink into the fabric better.
- Mix your block printing ink. I used a combination of white, blue and black to make a light gray blue. I used almost a full tube of white to do just over a yard of 55in fabric. To get the most uniform look try to mix up as much ink in the beginning as possible, because unless you measure or keep track of the exact mix it may be difficult to match your first color. Also the ink WILL dry lighter than your original color mix and some WILL wash out.

- Once mixed, keep your ink covered, I used a small plastic bag to cover, in between ink dips. It dries quickly. Also you can help this by adding TINY amounts of water(and I mean like small drips) . Just be careful not to use too much or your print will wash out or bleed all over your fabric. Another good reason to start with $1.50 a yard fabric--at least until you get the hang of it!
- Tape your stencil onto your fabric or use a stencil adhesive.
- Dab your sponge into the ink and blot it to get most of the ink off of your sponge before applying it to the fabric.
 Gently blot the sponge with ink into the fabric. I applied my print by hand, and eyeballed where to put each stencil. You can make your design more uniform by using a grid in disappearing ink before applying your design.
 - Pick up the stencil and move your stencil to the next spot and apply again. If the stencil overlaps any previous design make sure it is dry before applying.
- Apply your design over the entire fabric let it dry to the touch, and then heat set it. Either by putting the fabric in the dryer for 10 to 15 minutes or ironing the opposite side for several minutes. Make sure to use plenty of heat so that the ink does not wash out!


Once the fabric is heat set you can wash it or cut and use for any project. Make sure to use plenty of heat so that the ink does not wash out! To wash use the hand wash setting on your washer. Plan on some color variation depending on how well the ink was mixed.


Yea! At a $1.50 a yard plus supplies, options are endless!! It is easy, fun and beautiful!!
I made my fabric into some quick and easy pillows...
Cut 2 18.5" x 18.5" squares. Sew fabric right sides together leaving a fist sized whole open, pull the fabric inside out and stuff with filler Use your sewing machine to stitch the opening together and VOILA! So easy and gorgeous!


What do you think? Are you going to try this? I would love to see what you do with your own fabric!
Happy Printing!

This is the coolest thing ever! One...I will be pinning this. Two...I am definitely going to try this. I love the idea of making my own fabric in just the right colors. Thanks so much for the tutorial.
ReplyDeleteThanks Judy!! Thank you for pinning!!!! I would love to see what you do with your fabric!
DeleteFound your blog via the Shabby Nest-LOVE this idea!
ReplyDeleteI am going to do this ASAP for living room pillow covers for the spring :) Thanks again for the cool info- pinning for sure...
SJS
Thanks! I would love to see what you do!!
DeleteLove it!
ReplyDeleteLooks fabulous! May give it a try for drapes!!
ReplyDeleteThanks, I will be using it on my drapes next. Now to choose a color and a pattern!! Yea!
DeleteSeriously? This is FANTASTIC, Brit!
ReplyDeleteI would LOVE it if you'd link this up at Feature Friday FREE-FOR-ALL going on right now!
http://www.fivedaysfiveways.com/2012/02/feature-friday-free-for-all-6-little.html
Hope to see you soon!
~Abbie
Thanks for the invite Abbie! I will definitely be linking up! Loved your washer painting tutorial BTW!
DeleteThank you for this. I have been really wanting to try this, but couldn't make the time to figure it out. Perfect timing that I found your post. I'm assuming this would work for a dark stencil on linen or burlap as well. But, I do have a thing for damask. Really love this project. Thank you.
ReplyDeleteSo glad it was perfect timin for you! It will work on linen and burlap--Just make sure to prewash and heat set your design. Also it is a good idea to do a quick test and wash just to make sure the color stays!
DeleteI just did this exact same thing! I stenciled fabric to make dining chair covers. Your pillows look great! You can see mine here: http://imperfectlypolished.com/2012/02/09/stenciled-parsons-chair/
ReplyDeletegreat idea! Just found you...yippee!! Love damask, too!!
ReplyDeleteThanks, Janis!
DeleteThis is fantastic! I love the color you chose and the stencil is exactly what I have been looking for! Great pillows too! Glad I found yhou through Debbiedoo's Linkie party! I am now a follower - come by and see me too! Hugs, Leena, pinkcherunmoon.blogspot.com
ReplyDeleteGorgeous!!!
ReplyDeleteSharon @ mrs. hines class
Thank you!!
DeleteI love anything damask and this caught my eye over at 5 Days 5 Ways link up party. Using the ink method is brilliant. It looks like a designer piece of fabric, great job.
ReplyDeleteThank you, Stephanie!
DeleteI recently did the same thing, same stencil LOL! I love it...and I am loving the color you used. Thanks for sharing with my newbie party.
ReplyDeleteI LOVE this!!! My party just started...I would LOVE to have you stop by and share your projects!!! XO Aimee
ReplyDeleteoh, that is crazy gorgeous!!!!
ReplyDeleteThis is wonderful! I love stenciling and I have that same stencil which I have not used yet.
ReplyDeleteThank you so much for the great tutorial!
Thank you Maria! I am so glad you can use your stencil now!!
DeleteReally nice! I came out great! Fun idea to paint your own fabric with a stencil!
ReplyDeleteThank you Lisa! Loved your man cave curtains!
DeleteWow-what a great tutorial and I love your stencil choice! I'm your newest follower-stop by for a visit!
ReplyDeleteOh my gosh, I love this! I love the stencil that you chose...it's right up my design alley. Thanks for sharing the tutorial, I'm definitely going to try this!
ReplyDeleteI'm stopping over from the newbie party and I am your newest follower!
I'd love for you to come check out my (newbie) blog too and follow back, if you're so inclined.
Have a wonderful night,
Sarah
www.adventuresofourfamily.com
What a wonderful post! Love the instructions...I never would have attempted that but now I think I can do it! Thanks so much! xoxo Lorelei
ReplyDeleteThank you Lorelei! I loved your post on your fruit salad, now I know what to bring to the next family party!
DeleteI'm obsessed with freezer paper stenciling as well. Sharing at pinterest...You write a mean tutorial!!!
ReplyDeleteThank you!! I haven't tried freezer paper stenciling yet! Hmmm...add that one to the list...
DeleteHi Britt! Thanks for sharing that wonderful tutorial with us. I would have never thought to use that ink for fabric stenciling OR to mix the inks to get the color that you want. Your photos are beautiful too. I saw your post as a result of it being featured at "French Country Cottage". I am following you now.
ReplyDeleteJust wanted to let you know I featured your stencil pillows on my blog today!!
ReplyDeleteLove this,so clever
ReplyDeletex jeanetteann.
Thank you JeanetteAnn!
DeleteThis is really pretty! Thanks for sharing your how-to. I'm pinning this. :)
ReplyDeleteThank you! And thank you for pinning!!
DeleteThis turned out AWESOME!!!! I featured this on my blog just now! Thanks so much for sharing at my party!!! Can't wait to see what you link up this week!!! Just in case you haven't entered, my giveaway for 1000 full color business cards ends tonight at midnight!!! Glad to be following you!! XO, Aimee
ReplyDeleteI LOVE THIS PROJECT!! THIS WAS INFORMATION I HAVEN'T SEEN BEFORE!! GLAD I FOUND YOU!!
ReplyDelete