Thursday, January 26, 2012

My Best Thrift Store Find Ever!

Okay, so first I have a stack of projects that I am finishing up this week.  I promise I will have some great things soon, but until then I wanted to post about one of my most time consuming projects and that is teaching my children how to read. 

I have 3 boys ages: 8, 5 and 4.  They are in 1st grade, kindergarten, and preschool and all three are ready to read but not reading, yet.  My oldest is the sweetest 8 year old but is struggling with some special challenges.  It seems like every day he is falling farther and farther behind.  I am so worried about him.  So I try to use education related play at home to try and supplement what he is learning at school.  My favorite place to look for teaching resources is at my local thrift store. I cannot leave the store without scouring the book section for books that we can use at home. 

Not too long ago I stumbled on the book:  Teach Your Child to Read in 100 Easy Lessons for $1 at my thrift store.  I brought it home and read the Amazon.com reviews.  There were over 700 reviews and more than 500 were 5 star ratings, all from parents who had taught their children to read using this book.  Glancing through the book I noticed that every lesson was a script that I could read to my children.  We could spend "20 minutes" per day learning how to read together.  Not only that all I had to do (aside from the initial preparation) was to read along with them consistently every day. 

Now I am sure that there are a million other awesome reading programs, but for the price and work, this has been a fantastic resource for us.  My oldest is learning, and is able to sound out words, despite his challenges.  My other two boys are also learning so quickly!!  We are about 1/5 of the way through the 100 lessons.  Some days are better than others.  Sometimes we repeat lessons, sometimes we don't.  Sometimes we finish in 20 minutes, but it usually takes us closer to 30-40 minutes per lesson.  All the time has been and will be SO worth it!

I can't say enough good things about this book, and it truly has been one of my best thrift store finds ever!! 
If you are looking for a great way to teach your children how to read, whether they have special needs or not I HIGHLY recommend it. 

Do you have a favorite thrift store find?!

Thanks for the visit!


Tuesday, January 17, 2012

Bookcase Beauty


She started out plain and boring.  A heavy wood bookcase without personality and now she is painted and pretty.    Here is her embarassing before picture, poor girl.


With scratches and dents, she was in a sad state.  Her one benefit was that she was solid wood inside and out and that she was $15 from my local thrift store. 


I started first by sanding out the major dings and dents with my trusty orbital sander. 


Next she was primed and painted... with help (or not) from my 2 year old.


My husband attached new feet to give her a more finished look.   


Next I stenciled the back piece using a Martha Stewart Stencil from Michaels.  
I learned one lesson -- start on one side and move to the other side.  Do not go around the edges and try to meet in the middle or else you will make the same mistake that I did.  Good thing the worst part is in a place where no one will notice. 


Now for the distressing, I took a razor blade and started scraping the paint off the edges, and then glazed her. 

Next she was sealed with 3 coats of Polycrylic in a semi-gloss.  And here she is again!


I love her feet!


Here is how she looks in my house. I wish I knew how to stage...


And most importantly shelves and books within 2 year old reach!


 What do you think?  My paint color is Martha Stewart Living Paint in Popcorn (at $5 a quart), and glazed using Martha Stewart Black Coffee Glaze.


Linking to:

Boys Camoflauge Birthday Part 2

I promised the follow up on our birthday party, so here it is, you can read about part 1 here:

The most important part of a kids birthday party is the activities.  And the biggest activity challenge was keeping the kids inside and busy on a winter weather day!

  • We played a dress up relay game where I took a large basket and filled it with my husband's hunting clothes and put it at one end of the room.  At the other end we lined up the kids into 2 groups.  One person from each team had to run to the basket and put 3 items of clothing on completely, and then run to the back of the line and sit down before the next team member could go.  The first team with all of their members dressed and sitting won.  The clothing ranged from pants and jackets to hats and gloves.  Some things were easier than others to put on.  We had lots of laughs!!

  • Another fun game was the hunting box.  We filled a tote full of dried beans and the kids had to find certain mountain wildlife.  Most of the toys we used were from the dollar store.  Snakes, frogs, and other animals.  Now that the party is over I will use it for an ISpy Letter box to help my kids work on their letters and numbers.  Please ignore the ripped label...oops.
  • Next we lined the kids up and took turns shooting a Nerf gun at a paper bullseye.  This was fun too!
  •  We also had the kids draw a picture of the mountains or their favorite animal.  -- in order to get all of the kids to do this (use more time) we gave them a camoflauge notepad and pencil when they were finished.
  • My little sister also did camoflauge face painting.   They girls could have pink and red and the boys were the typical brown and green.   
  • Another game that we wanted to play was a veggie fear factor (I found this on an unkown blog--thank you!). Where each kid had to try a veggie they have never eaten before.  And when they were finished they earned a Smore on a Stick--a chocolate dipped marshmellow rolled in graham cracker crumbs--YUM!!!
  • And finally we ate cupcakes and icecream, opened presents and sent them all home.  Whew!
This ended up being a great party that the kids are still talking about. And the parents are too.  Only one warning I bought the facepaint at a party store and one parent had trouble getting it off of his daughter's face, and told me that the rest of the day he kept asking her if she felt okay, because her skin was tinted green.  ;)

I love being a parent!

Monday, January 9, 2012

Boys Camoflauge Birthday Party Part 1

I mentioned in my last post that my son's birthday was last week and in blogger style I went a little overboard with decorations!  We had a fun and crazy group of 17 kids!! 
My husband is a hunter and my oldest son loves to go with him on deer and elk hunts.  So there really wasn't a better party theme for his 8th birthday.  We were careful however, to keep the hunting theme really tame so we would not offend any parents.

We started by brainstorming typical hunting/camping gear and settled on backpacks.  I found some camoflauge fabric and we made all 17 kids a mini drawstring backpack.  This was the most time consuming part.  We (my little sis and I) followed a tutorial on Youtube to learn how to make them and they were really easy.  The only thing that I did differently was to surge all of my edges and the straps we used were just heavy fabric folded and surged on one side.  The eyelets that we used on the bottom were from Wal-Mart.  I would definitely reinforce these if you aren't using a heavy duty fabric.


The backpacks were a huge hit!!  The kids of all ages loved them. 
On to the rest of the decorations...

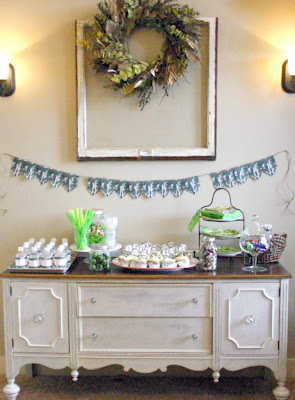
Minutes before the party started I arranged everything on our buffet and took a few shots.  Unfortunately, I wish I could go back and tweak a few things but, being the procrastinator that I am this is what I got!

I made and printed all of the banners, labels, and cupcake tags myself on the computer and printed them. 


Cupcake tags printed on paper and glued to toothpicks. 


To make the banner I just trimmed down some sheets of construction paper to fit in my printer and printed directly on it.  Then I cut out the letters and taped them around a strand of twine.  I loved how the construction paper curled a little more than regular paper.  I think it gave the banner a little more dimension. 


I also made little labels for the mini water bottles.  I wanted them to write their name on each one.  If I could go back I would just type the name on each, it's much faster!!


We played lots of games and for every game that the children played they earned goodies to take home.   Like these pencils and notepads

Stay tuned for part 2 of this party and I will tell you all of the games that we played and other fun activities!

It was so much fun!! 

PS.  You can read more in part 2 here


Linking to:


Visit thecsiproject.com

Saturday, January 7, 2012

Happy New Year!

I love January and the fresh start, the New Year brings.  The week following New Years however, is always a crazy time for me.  It is filled with hours in the kitchen and too much eating!  It all starts with New Years parties, next comes my husband's birthday on the 2nd and my oldest son's birthday just a few days later.  So this week I have been busy cooking, cleaning, and party planning.  And now that the major parties are over, including my son's birthday party (with an insane, 17 kids), I can breathe again.  And humbly say that Jen from The Consigner Designer has nominated me for the Liebster Blog Award!  Thank you so much Jen!!


The Liebster Blog Award is an award that brings attention to blogs with less than 200 followers.

 
Here are the rules:
  •  Choose 5 up and coming blogs of fewer than 200 followers to grant the Liebster Blog award.
  • Show your thanks to the blogger who gave you the award by linking back to them!
  • Post the award on your blog. Link back to the blogs you have given the Liebster Blog award to so everyone else can pay them a visit!

Now I get to nominate 5 blogs that I love, in no particular order!
They are:
OAK House 5 -- A blog by Kelly who has one of the most beautiful homes I have ever seen!
The Velveteen Rabbit -- A blog by Jessica who is a true inspiration because she can create a beautiful home and stay so positive despite her young daughter Maci having Leukemia.
From A to Being Creations -- A blog by Ashley who is refinishing her stairs and they are looking awesome but is SO very creative!
Stiltskin Studios -- A blog by a husband and wife duo who refinish furniture that are always GORGEOUS inspiration pieces!
Dumpster Diva -- A blog by Melissa who also transforms furniture pieces from garbage to gorgeous!

Congratulations!
Thanks again Jen!!  Jen recently created a baby mobile that is gorgeous so don't forget to stop by The Consigner Designer to see it!
Photobucket

Hope your day is Fantastic!

Monday, January 2, 2012

Martha Stewart Living Paint 50% off


Hey!  Just wanted to give you a heads up, if you need paint Home Depot is retiring all of the  REGULAR Martha Stewart Living Paint.  So you can get all sizes at 50% off.  A gallon of paint is as little as $12 a gallon.  You will want to hurry though, my store had ran out of the light base for the eggshell and semi-gloss paints.  They are not retiring the Martha Stewart Living colors or specialties, just the actually paint, which is made by Glidden anyway.  Hope your store still has some left!